目录
---------
Mocha
有时候我们写了一个函数,需要测试函数是否正确。如果使用 console.log 测试,项目部署后又要删除,所以并不合理。
单元测试是用来对一个模块、一个函数或者一个类来进行正确性检验的测试性工作。
mocha 是 JavaScript 的一种单元测试框架,既可以在浏览器中运行,也可以在 Node.js 环境测试
初始化
yarn add mocha -D
配置 package.json
"script": {
    "test": "mocha"
}
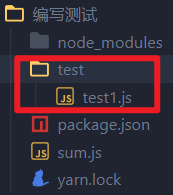
搭建文件目录:在根目录中新建 test 目录,写测试文件
之后运行以下命令即可
yarn test
基本测试
// sum.js
export default function(...rest) {
    let sum = 0
    for(let i of rest) {
        sum += i
    }
    return sum
}
nodejs 默认的 assert 库
nodejs 内置的 assert 测试方法不利于测试,具体为:
-
一段代码出错会阻塞其他代码的执行
-
定位错误的地方很麻烦
-
对于测试成功的代码没有任何表示
// test/test1.js
const sum = require('../sum')
// nodejs 内置的断言
const assert = require('assert')
assert.strictEqual(sum(), 0)
我们可以使用 mocha 提供的方法来做进一步封装
const { it, describe } = require('mocha')
describe('sum() test', () => {
    it('sum() should be 0', () => {
        assert.strictEqual(sum(), 0)
    })
    it('sum(1) should be 1', () => {
        assert.strictEqual(sum(1), 1)
    })
    it('sum(1, 2) should be 3', () => {
        assert.strictEqual(sum(1, 2), 3)
    })
    it('sum(1, 2, 3) should be 6', () => {
        assert.strictEqual(sum(1, 2, 3), 6)
    })
})
descibe 表示规定一组测试,可以嵌套 descibe 和 it 函数,第一个参数表示描述一组测试的总体语句。
it 表示规定一个测试,不可以嵌套,第一个参数表示描述这一个测试的语句
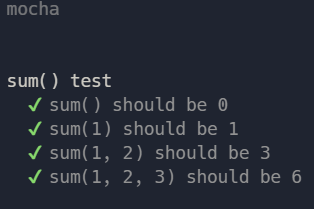
运行成功后的结果,对于测试的结果表达很清晰,而且即使错误也不会阻塞其他代码执行:
chai 库的 assert 库
assert 断言库有很多,这里使用了 chai 依赖包,安装
yarn add chai -D
chai 库的使用有很多风格,这里一一介绍
assert对象
const { assert } = require('chai')
describe('assert demo', () => {
    it('use assert lib', () => {
        const value = 'hello'
        assert.typeOf(value, 'string')
        assert.equal(value, 'hello')
        assert.lengthOf(value, 5)
    })
})
should对象
const { should } = require('chai')
should() // 一定要先调用函数,不知道啥原理
describe('should demo', () => {
    it('use should lib', () => {
    	const value = 'hello'
        value.should.exist.and.equal('hello').and.have.length(5).and.be.a('string')
    })
})
这一串的 should 也可以分开写:
value.should.be.a('string')
value.should.equal('hello')
value.should.not.equal('hello2')
value.should.have.length(5)
expect对象
const { expect } = require('chai')
describe('expect demo', () => {
    it('use expect lib', () => {
        const value = 'hello'
        const num = 3
        expect(num).to.be.at.most(5)
        expect(num).to.be.at.least(3)
        expect(num).to.be.within(1, 4)

        expect(value).to.exist
        expect(value).to.be.a('string')
        expect(value).to.equal('hello')
        expect(value).to.not.equal('hi')

    })
})
异步测试
mocha 提供了两种方式对异步方法进行测试
新建 1.txt
hello
编写测试代码
done方法,表示代码执行完毕
const fs = require('fs')
const assert = require('assert')
const path = require('path')
describe('async text', () => {
    it('async read file1', (done) => {
        fs.readFile(path.join(__dirname, '/../1.txt'), 'utf-8', (err, data) => {
            if(err) {
                done(err) // 使用 done 方法抛出一个 err
            } else {
                assert.strictEqual(data, 'hello')
                done() // 表示代码执行完毕
            }
        })
    })
})
async/await方式(推荐)
const fs = require('fs/promises')
describe('async test', () => {
    it('async read file', async () => {
        const data = await fs.readFile(path.join(__dirname, '/../1.txt'), 'utf-8')
        assert.strictEqual(data, 'hello2')
    })
})
http 测试
http 测试其实和异步测试差不多,只是需要请求 api
// test/1.test
const axios = require('axios')
const assert = rquire('assert')
describe('api test', () => {
    it('html template test', async () => {
        const res = await axios.get('http://localhost:3000/')
        assert.strictEqual(res.data, '<h1>hello</h1>')
    })
})
但这样我们需要手动启动服务器,然后进行测试,非常不合理,这里我们使用 supertest 库进行 http 测试,安装:
yarn add supertest -D
更改服务代码:
注:这里并没有启动服务,而是将 app 实例导出
// app.js
const Koa = require('koa')
const app = new Koa()
app.use((ctx) => {
    ctx.body = '<h1>hello</h1>'
})
module.exports = app
更改测试代码:
// test/test2.js
const supertest = require('supertest')
const app = require('../app')
describe('api supertest', () => {
  	let server = app.listen(3000) // 这里将 app.listen() 方法赋值给 server
  	it('html template supertest', async () => { // 使用 async/await 方式测试异步 http 请求
    	await supertest(server).get('/')
      	.expect('Content-Type', /text\/html/) // 测试 `Content-Type` 字段
      	.expect(200, '<h1>hello</h1>') // 测试返回内容字段
  	})
    after(() => {
        server.close() // 关闭服务器
    })
})
钩子函数
mocha 自带钩子函数,看下面示例
describe('hello.js', () => {
    before(() => {
        console.log('before:')
    })
    after(() => {
        console.log('after:')
    })
    beforeEach(() => {
        console.log('beforeEach:')
    })
    afterEach(() => {
        console.log('aftereach:')
    })
})
使用钩子函数改善 http 测试代码
// test/test2.js
const supertest = require('supertest')
const app = require('../app')
describe('api supertest', () => {
  	let server
  	it('html template supertest', async () => { // 使用 async/await 方式测试异步 http 请求
    	await supertest(server).get('/')
      	.expect('Content-Type', /text\/html/) // 测试 `Content-Type` 字段
      	.expect(200, '<h1>hello</h1>') // 测试返回内容字段
  	})
    before(() => {
        server = app.listen(3000)
    })
    after(() => {
        server.close() // 关闭服务器
    })
})
before 表示 describe 一组测试前的钩子函数,after 表示 describe 一组测试后的钩子函数
beforeEach 表示 it 一个测试前的钩子函数,afterEach 表示 it 一组测试后的钩子函数
Vitest
由 Vite 提供支持的极速单元测试框架
初始化
安装:
yarn add vitest happy-dom @vitest/coverage-c8 -D
配置 package.json
以下配置也可以直接使用 npx vitest 自动配置:
"scripts": {
  "test": "vitest",
  "coverage": "vitest run --coverage"
}
yarn test表示测试文件yarn coverage可以看到测试的覆盖情况- %stmts 是语句覆盖率(statement coverage:是不是每个语句都执行了
- %Branch 分支覆盖率(branch coverage:是不是每个 if 代码块都执行了
- %Funcs 函数覆盖率(function coverage:是不是每个函数都调用了
- %Lines 行覆盖率(line coverage:是不是每一行都执行了
配置 vite.config.ts:
/// <reference types="vitest" />
import { defineConfig } from 'vite'
import vue from '@vitejs/plugin-vue'

// https://vitejs.dev/config/
export default defineConfig({
  plugins: [vue()],
  test: {
    environment: 'happy-dom'
  }
})
基本测试
判断 js 字符拼接以及数字运算是否正确
import { describe, it, expect } from 'vitest'
descibe('first test demo', () => {
  it('should be true', () => {
    expect('hello' + ', world').toBe('hello, world')
    expect(1 + 1).toBe(2)
  })
})
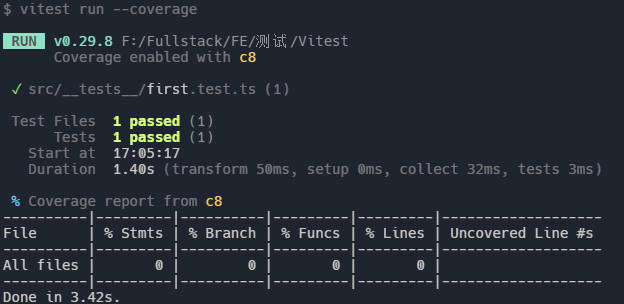
- 运行
yarn test可以看到控制台的输出:

可以清楚地看到 Test Files 和 Tests 均通过
- 运行
yarn coverage
需要实现安装
@vitest/coverage-c8依赖
测试文件
vitest 没有默认配置测试组建的功能,需要安装 Vue 推荐的测试库 @vue/test-utils
yarn add @vue/test-utils -D
简单的示例
注:vue 中的
props参数数据和组件中定义的数据测试方法是不同的,如果需要测试props数据,需要在mount的第二个参数指定props属性,如果测试文件中的数据,则不需要第二个参数
import { describe, expect, it } from 'vitest'
import { mount } from '@vue/test-utils'
import Button from '../components/Button.vue'

describe('Button component', () => {
  it('shoule have hello world', () => {
    const wrapper = mount(Button, {
      props: {
        msg: 'hello world'
      }
    })
    expect(wrapper.test()).toBe('hello world')
  })
})
这段代码表明,Button.vue 组件拥有 msg 的 props 参数,且断言(expect) msg 应为(toBe) ‘hello world’
如果想要断言正确,那么应该会有这样的两个组件:
// App.vue
<template>
	<Button msg="hello world" />
</template>
// components/Button.vue
<script lang="ts" setup>
defineProps<{
  msg: string
}>()
</script>
<template>
	<div>{{ msg }}</div>
</template>
props
上述代码只测试了一个 props 参数,对于测试多个 props 参数,需要使用 wrapper.props() 方法
- 组件:
// App.vue
<template>
	<Counter msg="hello world" :count="0" />
</template>
// components/Counter.vue
<script lang="ts" setup>
defineProps<{
  msg: string
  count: number
}>()
</script>
<template>
	<div>msg: {{ msg }}</div>
	<div>count: {{ count }}</div>
</template>
- 测试文件:
使用 warpper.props() 方法获取组件的 props 参数
const wrapper = mount(Counter, {
  props: {
    msg: 'hello world',
    count: 0
  }
})
const { count, msg } = wrapper.props()
// 等同于
// count msg = wrapper.props('msg')
// const count = wrapper.props('count')
expect(msg).toBe('hello world')
expect(count).toBe(0)
get、trigger
利用 get、trigger 方法测试文件的数据和函数能
- 组件:
在渲染 count 的标签上加上 data-test 属性,这个属性可以任意定义。
// Function.vue
<script setup lang="ts">
import { ref } from 'vue'
const count = ref(0)
function increment() {
  count.value ++
}
</script>
<template>
  <div>
    <div data-test="count">{{ count }}</div>
    <button class="btn" @click="increment">count++</button>
  </div>
</template>
- 测试文件
get 方法可以获得网页中的某一个标签,既可以通过传统 css 选择器方式,也可以通过自定义标签属性来获取(上述代码中的 data-test 属性)
get方法返回的是一个DOMWrapper类型,意味着我们可以对齐进行 DOM 操作需要注意的是,操作 DOM 元素的方法往往是异步的(正如我们对网页的元素操作一样),所以需要
async/await语法糖
import Function from '../components/Function.vue'

test('function component', async () => {
  const wrapper = mount(Function)
  expect(wrapper.get('[data-test="count"]').text()).toBe('0')
  await wrapper.get('.btn').trigger('click')
  expect(wrapper.get('[data-test="count"]').text()).toBe('1')
})
假如有多个含有
data-test=“count”属性的标签,那么get只会获取第一个
find、findAll、exists
find方法通常与exists方法搭配使用
find 与 get 类似,只不过当 find 无法查找到对应的标签时,会返回一个 ErrorWrapper 的类型值,而 get 则会直接报错
那既然不会报错,那我们怎么测试呢?
@vue/test-utils 为我们提供了 exists 方法,当返回值的类型为 ErrorWrapper 的时候,那么其对应的 exists 方法返回的是 flase
// Function.test.ts
const btn = wrapper.find('.bt')
expect(btn.exists()).toBe(false)
find方法只能查找一个 DOM 元素,返回的类型是DOMWrapper,findAll则可以查找多个 DOM 元素,返回的类型是DOMWrapper[]
find 方法查找 ref 属性需要改变一些参数
<div ref="div_test"></div>
const wapper = mount(Function)
const div_test = wrapper.find({
	ref: 'div_test'
})
expect(div_test.exists()).toBe(true)
attributes
attributes 这个方法主要获取组件根标签的 DOM 标签元素属性
组件:
// components/Attributes.vue
<template>
  <div id="foo" data-test="attr"></div>
</template>
测试文件:
使用 attributes(key) 来获取根标签元素属性为 key 的值
// Attributes.test.ts
test('attributes component', async () => {
  const wrapper = mount(Attributes)
  const id = wrapper.attributes('id')
  const attr = wrapper.attributes('data-test')
  expect(id).toBe('foo')
  expect(attr).toBe('attr')
})
classes、toContain
attributes 获取根标签元素有个问题,那就是 class 类名在取多个的时候,返回的依旧是字符串,这不利于测试,也不符合测试的规范。
classes 可以获取根标签的 class 类名,并且返回一个数组。如果我们想要测试该数组是否包含某个类名,可以使用 toContain 方法
// components/Attributes.vue
<template>
  <div id="foo" class="bar hello" data-test="attr"></div>
</template>
const wrapper = mount(Attributes)
const classes = wrapper.classes()
expect(classes).toContain('bar')
classes(key)方法也可以传递一个参数,代表查找根标签对应的类名。当传递参数时,返回的值类型为布尔值,表示如果根标签中含有key,则返回true,否则返回false
const hello = wrapper.classes('hello')
expect(hello).toBe(true)
getComponent、getAllComponents
getComponent 主要用来测试文件中是否包含其他子组件
组件:
// Father.vue
<template>
	<Son class="son" />
</template>
// Son.vue
<template>
	Son 组件
</template>
测试文件:
findComponent 的参数主要有三种写法:
- 将子组件
import进来作为参数 - 设置子组件的
class类名或者其他属性,使用css选择器 - 传递组件自带的
name属性
const son1 = wapper.findComponent(Son)
const son2 = wapper.findComponent('.son') // 需要子组件添加类名
const son3 = wapper.findComponent({
  name: 'Son' // 'son' 也可以,首字母不区分大小写
})
expect(son1.exists()).toBe(true)
expect(son2.exists()).toBe(true)
expect(son3.exists()).toBe(true)
findAllComponents
主要用于测试多个子组件
组件
// Father.vue
<template>
	<Son />
	<Son />
	<Son />
	<Son />
</template>
测试文件
const sons = wrapper.getAllComponents(Son)
expect(sons.length).toBe(4)
html
html 方法主要用来测试组件的 html 结构
网页结构:
// HTML.vue
<template>
	<div>
    <h1>HTML 页面</h1>
  </div>
</template>
测试文件:
const wrapper = mount(HTML)
const html = wrapper.html()
expect(html).toBe(
	'<div>\n'+
  '  <h1>Hello 页面</h1>\n'+
  '</div>'
)
isVisible
isVisble 主要用来测试 DOM 元素是否隐藏
前置知识:v-if 和 v-show 的区别
v-if是真实的按条件渲染,确保了在切换时,条件区块内的事件监听器和子组件都会被销毁与重建
v-if也是惰性的,如果初次渲染条件值为false,则不会做任何事。只有当条件首次变为true时才会被渲染
v-show无论条件如何,时钟会被渲染,只有 CSS 中的display属性会被切换
v-if有更高的切换开销,而v-show有更高的初始渲染开销。如果需要频繁切换,使用
v-show更好,如果绑定的判断条件很少改变,则v-if更合适
网页结构:
// Visible.vue
<template>
  <div>
    <div class="dis_none" v-show="false">隐藏的元素</div>
    <div class="vis_hide" v-show="false">隐藏的元素</div>
    <div class="elm_show" v-show="true">显示的元素</div>
  </div>
</template>
测试文件
// ...
...这个方法似乎有问题
setData
并不支持 vue3.2 最新的 <script setup> 写法,评价为一般
setProps
setProps 方法可以更改组件的 props 属性
网页结构:
<script setup lang="ts">
defineProps<{
  msg: string
}>()
</script>

<template>
  <div>
    {{ msg }}
  </div>
</template>
测试文件:
const wrapper = mount(Props, {
  props: {
    msg: 'hello world'
  }
})
const html = wrapper.html()
expect(html).toContain('hello world')
await wrapper.setProps({ msg: 'hi world' })
const html2 = wrapper.html() // 记得重新获取
expect(html2).toContain('hi world')
setValue
setValue 主要用来测试以下 DOM 元素
<input>type=“checkbox”和type=“radio”,setValue可以设置element.checked属性
<select><option>,setValue可以设置element.selected属性
网页组件:
<script setup lang="ts">
import { ref } from 'vue'
const text = ref('')
</script>

<template>
  <div>
    <input type="text" v-model="text" />
    <span>{{ text }}</span>
  </div>
</template>
测试文件:
test(' component', async () => {
  const wrapper = mount(Value)
  await wrapper.find('input[type="text"]').setValue('good')
  expect(wrapper.find('span').text()).toBe('good')
})